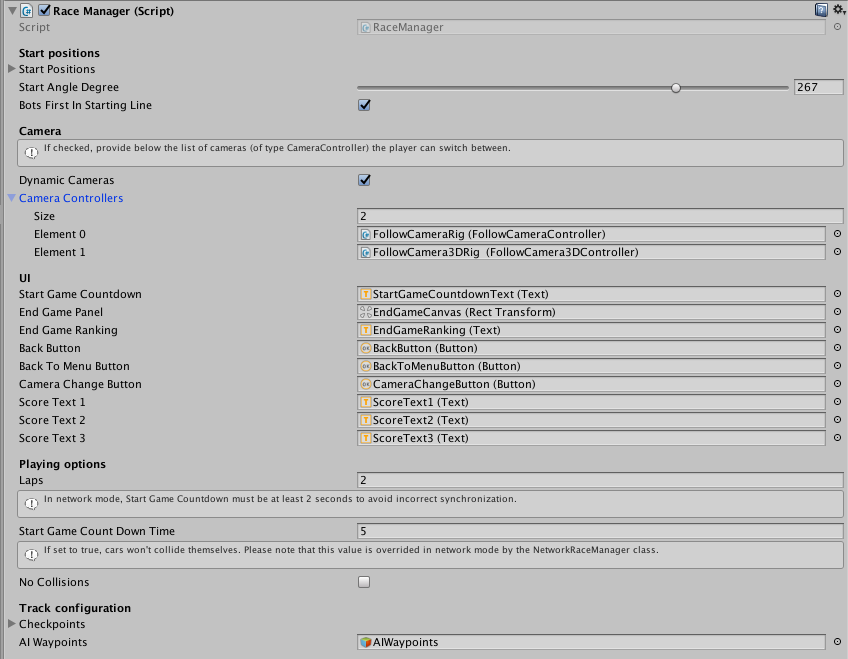
RaceManager
The RaceManager is the main track’s class. Its inspector easily allows an overview of its properties.
-
Start positions : determines the start position and direction of the vehicles. You can move these positions directly from the scene view.
-
Cameras : a list of the available cameras. If the camera is available (for example the behind camera for a single human player), then the player can switch between cameras using a button while playing.
-
UI : links to the different UI elements that will be accessed by the manager (score, start countdown, etc.).
-
Playing Options : number of laps, initial countdown, etc.
-
Track Configuration : a list of all the checkpoints the vehicle must cross to complete a lap, as well as a link to the GameObject containing the list of AI waypoints.
-
Test Mode : allows you to test the track without going through the lobby. When the game starts without a persistent Lobby object (created in a lobby scene), the manager switches to Test mode and instantiates the vehicles setup in that part of the inspector. To do so, simply drag the prefabs you want to use either as human player or as bots.

NetworkRaceManager
This class manages the race in Online mode : synchronizes players and race status through the network. It only requires a reference to the RaceManager. A “no collisions” checkbox is also added to remove collisions while in Network mode. The reason for that is that Unity’s physics management is non-deterministic and this can cause weird behaviors between clients. It’s strongly recommended to remain in no collisions mode while online.
Track construction
The track on which the vehicles will race is a mesh that will be used to detect collisions via Unity’s physics. In the example of the TinyCars game, gravity is used to maintain vehicles on the ground. It also adds a notion of OffRoad, different meshes that will affect the vehicle’s properties when driven upon.
On the Aphex game, gravity is disabled. Gravity forces and counter gravity are applied on the vehicle depending on its distance to the ground, with a spring effect when optimal position is reached.
On the TinyCars game, the vehicle’s collider being in contact with the ground, it glides via friction to move. This means that you must make sure that your collider has rounded corners on the ground (using spheres for the wheels is a good solution) so that the vehicle can climb slopes or go from the grass up to the track. In our tutorial we use a CapsuleCollider with a rotation-fixed RigidBody.
When using a Solid controller, the suspensions will determine the distance to the ground. This allows for a more dynamic approach, the use of loops and uneven ground.
Have a look at our complete tutorial for the creation of a new track from scratch. You can also use the track pieces provided with the engine. Check out this tutorial for more about them.
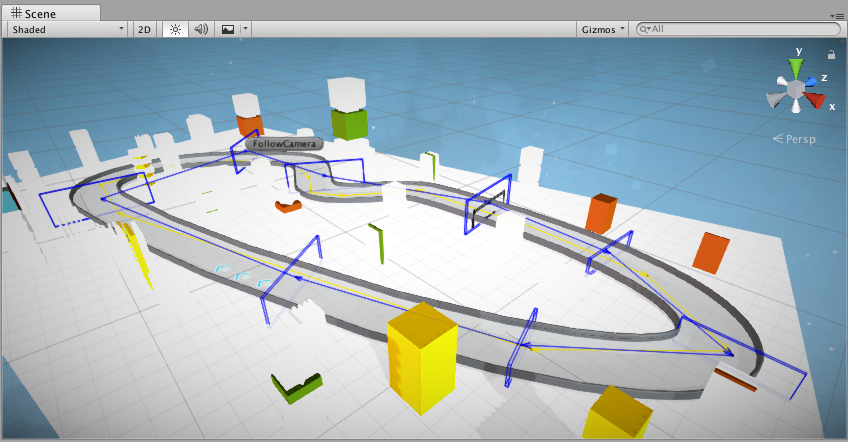
Checkpoints
The RaceManager’s list of checkpoints is a list of gameobjects with a Collider component and a tag “Checkpoint”. When a vehicle goes through such an object, its progress on the track is recorded. If you select the RaceManager, you’ll see the checkpoints linked by a line in scene view, allowing you to get a better idea of how they’re linked and ordered.
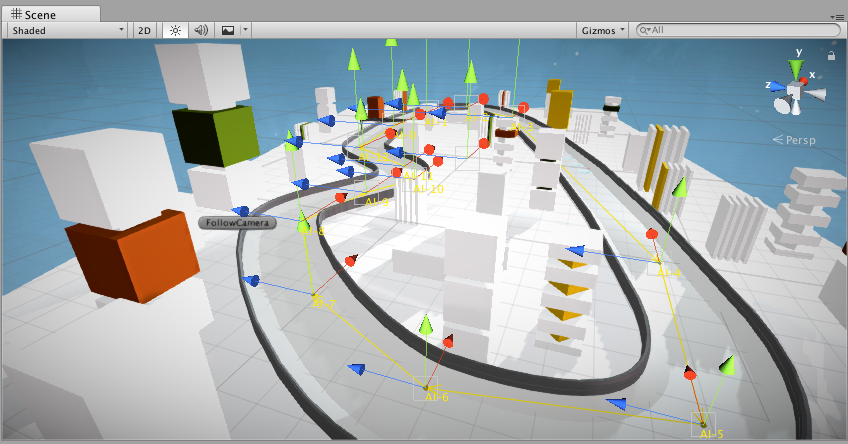
AIWaypoints
This gameobject contains a list of Vector3, targeted successively by the AI as it progresses over the track. The Scene view allows you to move these waypoints directly. You can also insert an item in the array via a right click in the inpsector at the desired position.
Cameras
Different cameras are available. Some are setup to allow only a single player like the Follow3D camera that will rest behind the vehicle. See the Cameras page for more.